Friday, October 28, 2016

HOW TO PROPERLY USE AN A/C VACUUM PUMP

It occurred to me that not everyone knows how to use (or even uses) an evacuation or vacuum pump after doing some kind of work on an A/C system.  Obviously you could take it to some mechanic shop and have them do it (lame) or buy a vacuum pump like I did and do it yourself. It isn't hard to do just a little tricky.

First get yourself a cheap vacuum pump.  Here is mine:
single stage vacuum pump gauge ports
single stage vacuum pump you can see the hose ports

vacuum pump oil level and drain bolt (very necessary)
In a basic sense, the vacuum pump boils water vapor out of the A/C system that you left open to the air.  This leaves no water in the system which can form ice and mess up all kinds of stuff (not to mention the oil which is hydroscopic.......that means it absorbs water.)  In order to do this of course you have to have an A/C hose and gauge manifold like the one shown below.
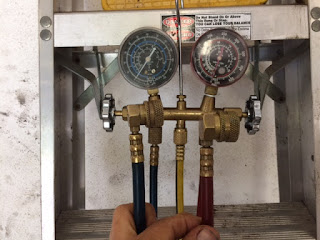
r134a gauge manifold high and low pressure
Here is the A/C manifold gauge with high and low side connectors shown
The blue is for the low pressure (suction) side of the system and the red is for the high pressure side.  Both need to be connected to the system when vacuuming out the system in order to get all the water out.  The yellow hose in the middle of the gauge manifold is the one you plug into the vacuum pump. Find the proper connection size (mine had three) and twist it on.  Attach the hoses to the ports on your car.  Make sure the two handles on the ends are turned all the way to the right (closed) and turn on the vaccum pump.  It should run for a couple of minutes before you open the valve handles (left turn) and let it start sucking all the moisture out of the a/c system.  On my pump a slight foggy mist comes out of the fill port of the pump as it boils out the moisture.  Cool.
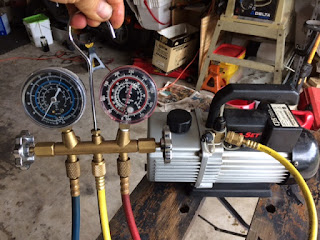
r134a gauge connected to vacuum pump
The yellow attached to the vacuum pump
With the gauge cluster attached, the pump running and the handles open, the blue gauge with the smaller numbers will have a part that measures vacuum to the right of 0 on the pressure gauge.  As the vacuum pump pulls more and more vacuum the gauge will read a vacuum more towards 30 hg (which is what you want).  If for some reason it dosn't move at all, you probably have a sizable leak somewhere and you need to find it in order to close it off.  It is usually an o ring or some other fitting so look carefully.
a/c gauge low side no vacuum
blue gauge at zero, vacuum pump not started

a/c gauge low side vacuum at 29hg
vacuum pump close to 30 hg vacuum means its working
Once you have a good 30hg of vacuum then let it run for 30 to 45 minutes.  Turn the valve handles on either side of the manifold gauge to the right (closed) and turn off the vacuum pump.  Failure to close the handles can make the vacuum you created in the car's system suck all the oil out of your vacuum pump and into the car which is a disaster (dont ask).  Watch the gauge for any drop in vacuum for a few minutes, there should be no drop, and if it looks good fill it with the refrigerant.  Or just disconnect it and put the caps back on the ports.
Do not be in a hurry to do this because the process takes over an hour anyways so why rush?  Put on your favorite music, read a magazine or whatever because you just saved yourself a bundle of cash.  And dont loose your cool.

MAZDA MIATA BRAKE ADJUSTMENT PAIN


Anyone who owns a Mazda Miata and has replaced the brake pads on the rear wheels knows that adjustment of the parking brake is the biggest pain ever!  On the rear of the rear brake caliper is a small 14mm bolt that covers a secret adjustment screw.  It is this screw (it uses a 4mm hex) is the cause of a lot of problems when installing rear pads.

Above is an example of a rear caliper.
This is the hidden bolt on the rear of the caliper.  The spring/cable bracket is removed for clarity.
Once you have the bolt removed (it has a washer so dont lose it) you can loosen the piston to fit the new pads.
It takes a 4mm hex or allen to retract or tighten the e-brake actuator.  Once you have retracted the piston as far as you need to put in the new pads, put the whole caliper back onto the disk and tighten the caliper bolt to specifications.  The hidden bolt should still be open at this time because we are not done with it yet.  With the wheel off the ground (obviously) slowly turn the disk and tighten the retracting screw with the 4mm hex (or allen for you weirdos) until the disk stops moving. Back off the screw about 1/3 (thats one third) of a turn and see if the disk turns freely.  If not back off a little more till it turns.  Then tighten the hidden bolt cover and you are done.  
If, for some reason know only to you, your screw falls out onto the ground while manipulating the caliper this is what it looks like.
mazda miata rear caliper adjustment piston re-tractor screw
Just stick it back in and continue no harm done.  If for some reason it becomes hard to turn the screw, please for the love of all thats holy do not force it or you just bought a new caliper.  It doesn't take much force to adjust the screw and you will destroy it if you do it too hard.  Run your car for a few miles checking the rear brakes for seizing (that means you tightened it too much).  Get back under the car and loosen the bolt and loosen the screw a small bit to make the parking brake the perfect distance between too tight and not tight enough.  
Because not all brake pads are the same size and shape as the original Mazda brake pads, it is probably not possible to get it right on the first try (God knows I didn't )but keep at it and you will have it perfect.  Keep your Zen attitude and you will probably get it done quickly........maybe.

Tuesday, October 25, 2016

2003 Ford Escort SPI engine destruction

2002 FORD ESCORT 2.0 SPI ENGINE FRAG


The Ford 2.0 single overhead camshaft engine is a real piece of work. It has an inherent flaw that results in the entire engine having to be scrapped:  the valve seats come loose. Yes, yes, I know.  That doesn't seem possible since no engine would work with that problem as they all have valve seats, and yet here we are discussing it.  There are many articles online about this particular problem but there are no real solutions.  Perhaps the only viable solution I personally have come across is 1. changing out the cylinder head with one that has reinforced valve seats.  Any other solution, and I have seen some crazy ones, will lead to the engine totally destroying itself as it eats bits and pieces of valve seat. This also happens to be the cheapest route to fixing these engines, assuming of course that yours hasn't already fragged. 

One other solution, one that is a bit more extreme, is to 2. change out the SPI engine with the DOHC engine of the same size.  Since Ford makes two engines for this same car, including the Focus, it is possible to change out the engines as long as you get a few things from the DOHC car.  A new air intake box is needed, a new exhaust pipe, possibly a new automatic transmission (although many have just bolted the existing one on) and the wiring which includes a new computer.  This will result in a complete and noticeable change and will give you a more powerful engine with the same gas mileage, if you care about that sort of thing.  Personally I care more about my engine totally destroying itself and leaving me stranded than MPG.  But that's just me.