Tuesday, August 11, 2020

1996 FORD MUSTANG GT BUMPER ENERGY ABSORBER REPLACEMENT

 SO YOU CRASHED YOUR 1996 MUSTANG

Location of the EAs behind bumper bar


Replacing the bumper and energy absorbers in a 96 mustang is not as bad as you might think.  So your daughter rear ended a pickup truck and now the front of the mustang is screwed.  No problem!  There are lots of parts available and if you have patience and the Zen attitude, you mustang will be on the road soon.  But first you need to make sure the front bumper stays on and correctly oriented.  To do this the energy absorbers will have to be replaced and new ones welded in.  Its not that hard and and can be done at home.

Insertion of new EA

Hole of old EA and corresponding welds
 

The EA's are spot welded to the frame of the car so you will have to drill them out.  Be careful, because there are a couple of hidden welds on the side of the EA where it fits into the frame hole.  The rest are outside and clearly visible. A nice chisel helps to break them once they have been weakened  by the drill.  Take your time, its a process.  If you find that the hidden welds are too hard to drill out (because they are on the sides of the frame, then take a huge hammer and hit the EA up and down until the weld breaks.  It will come off eventually and then you are home free!  The key here is taking time to remove the welds and then tacking a new weld on to hold the EA. 


Here you can see the new EA tack welded in and then primed to prevent rust.


Tuesday, September 3, 2019

HELPFUL WEBSITES FOR MECHANICS (as if)

THE INFO WAR

Finding information online that isnt compromised or full of trojan horses is no easy task.  While you can obviously torrent a lot of manuals or information, its much quicker to just load a web page and look it  up. Here are a few websites I use for working on vehicles that have been helpful:


This website is not a repair website, but rather a list of cars and their reliability from a database of research done on particular models.  It is very useful when trying to decide what car to buy or tell someone which car is more reliable.  Often people will ask me what to buy since I work on them all the time.  (Don't tell anyone but my answer is usually Toyota)


This website has been very helpful when it comes to diagnosis and I don't have the info on hand.  Doesn't matter who you are, there is nothing like a good diagnosis to save time and money.  It includes particular models and cars but is most useful for American made vehicles.  


Here is a place you can go to find out local prices for repairs. I have found it useful for charging a fair price if I'm not charging an hourly rate.  I also refer customers to this website when they have questions about what a repair will charge or where to go for a repair.  


If you own a mazda miata or are working on one this is a great resource for miatas.  I used it in my miata rebuild and I'm sure others have too.  

Thursday, August 22, 2019

Need a manual? Look no further

Free Online Car Repair Manuals


It's always hard to find revelant information when repairing vehicles.  This website is slow but it does have the info if you have patience.  I've used it many times.  Enjoy!!


Saturday, April 27, 2019

2004 HONDA CRV PULLING TO THE RIGHT/STRUT PROBLEM (other hondas too)

HELP MY CRV IS NUTS!!

If you hate it when your Honda pulls to the right even though its has perfect alignment, never fear!! The answer is here!!

The top of the strut has a mounting cushion that the coil spring fits into.  This cushion gets twisted or misaligned and the spring sits on a different spot causing a camber change in the tire.  As a result, the car pulls to the right.

With the strut off, change the orientation of the rubber cushion to the spring.  You will have to compress the spring with a tool, then loosen the top to move the cushion, or just remove it entirely.  Its hard to believe that Honda didnt issue a recall on this problem but that business for you. They dont get rich handing out money. 

Friday, February 8, 2019

MAZDA 3 FUEL TANK LOCK RING

THE GREAT MAZDA SCREW UP


If your Mazda 3 generates a check engine code that says something to the effect of "Large EVAP leak detected" then this will probably apply to you. If your Mazda 3 starts leaking tons of gasoline when you fill up the tank, this definitely applies to you.


The fuel tank lock ring, or the plastic ring the has threads on it to secure the fuel pump has probably failed in a major way.  The plastic ring literally splits down the middle and suddenly there is a huge hole in the top of the gas tank.  The evap code will point to this but it would be very hard to detect without pulling the fuel tank out, so most people ignore it.  Eventually the plastic ring splits wide enough to let gasoline spill out and you are forced to deal with it.  

There is no way to remove and replace this ring without pulling the fuel tank out.  Although there is a small access port underneath the back seat, it is used for disconnecting the wiring to the fuel pump, not replacing the ring.  There is simply no space to put a tool in there and the ring is on hella tight.
Aside from disconnecting a few annoying evap hoses, the fuel tank is relatively easy to remove as long a you can get your fingers in the tight spaces to use a fuel disconnect tool to unhook the fuel and evap lines.  The ones on the rear near the evap canister are the worst and be prepared to use a lot of zen concentration and beer.  The real challenge is getting the old ring off without destroying the fuel pump.  Its all plastic so for craps sake go easy.  The torque on the ring is between 59-89 ft. lbs for some reason but I would be careful not to tighten it too tight.  You might need a tool like this one by Lisle .  It worked pretty good for me but then I was always lucky.  Good luck and send Mazda a flaming bag of poop for using such a crappy design.  

P.S. the new plastic ring from Mazda dealer is $75.  More flaming dog poop required for that debacle too.

Monday, February 5, 2018

2002 Honda Civic Timing Belt Tensioner Bolt Craziness: CHANGE IT !!!!!!!!!!!!😱😱😱😱😱

4MM OF DEATH

If you are in the unfortunate process of changing a timing belt for a 2002 Honda Civic, then here is a little friendly advice: Change The Tensioner Bolt.😱

For reasons only know the the five smartest people in the Honda Corporation, the tensioner bolt is 4mm too short and will strip the last few threads out of the block causing the timing belt to loosen and destroy the valves in the cylinder head.  There is a new bolt you can order from Honda and it is 4mm longer than the old one.

Its not that I am paranoid, its just that I have had to change out valves on a honda civic engine once apon a  time and I'm not going back there.  Not sure if you have the upgraded bolt or not on your Honda?  Here is a sure way to figure it out.  Take the new tensioner you bought with the new timing belt for your Civic, and put the bolt through it.  Next, take a ruler or vernier caliper and measure the bolt protrusion.  It should be 15mm of thread.  If it is not (and mine was not) then you have the old bolt.  It turns out that 4mm is enough to doom your Honda engine to certain death.  Spank you Honda, spank you very much.

Remember:  15mm of thread protrusion past the tensioner.


Wednesday, March 22, 2017

2001 Chevrolet Impala 3.8 Turn signal not working

Impala blinker Craziness


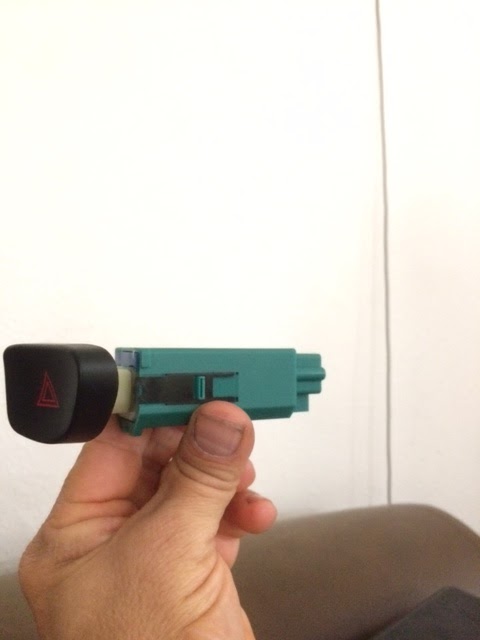
If your 2001 and similar model Impala's turn signals are not working or working erratically then this is probably the fix for you.  Its the hazard module located in the dash. This is what it looks like.

When this device fails, the turn signals will not flash properly and might make you think that the whole turn signal stalk is faulty.  Try tapping on this triangle button when the turn signals dont work.  If they start flashing then this switch is at fault.  Cheers!!

Friday, October 28, 2016

HOW TO PROPERLY USE AN A/C VACUUM PUMP

It occurred to me that not everyone knows how to use (or even uses) an evacuation or vacuum pump after doing some kind of work on an A/C system.  Obviously you could take it to some mechanic shop and have them do it (lame) or buy a vacuum pump like I did and do it yourself. It isn't hard to do just a little tricky.

First get yourself a cheap vacuum pump.  Here is mine:
single stage vacuum pump gauge ports
single stage vacuum pump you can see the hose ports

vacuum pump oil level and drain bolt (very necessary)
In a basic sense, the vacuum pump boils water vapor out of the A/C system that you left open to the air.  This leaves no water in the system which can form ice and mess up all kinds of stuff (not to mention the oil which is hydroscopic.......that means it absorbs water.)  In order to do this of course you have to have an A/C hose and gauge manifold like the one shown below.
r134a gauge manifold high and low pressure
Here is the A/C manifold gauge with high and low side connectors shown
The blue is for the low pressure (suction) side of the system and the red is for the high pressure side.  Both need to be connected to the system when vacuuming out the system in order to get all the water out.  The yellow hose in the middle of the gauge manifold is the one you plug into the vacuum pump. Find the proper connection size (mine had three) and twist it on.  Attach the hoses to the ports on your car.  Make sure the two handles on the ends are turned all the way to the right (closed) and turn on the vaccum pump.  It should run for a couple of minutes before you open the valve handles (left turn) and let it start sucking all the moisture out of the a/c system.  On my pump a slight foggy mist comes out of the fill port of the pump as it boils out the moisture.  Cool.
r134a gauge connected to vacuum pump
The yellow attached to the vacuum pump
With the gauge cluster attached, the pump running and the handles open, the blue gauge with the smaller numbers will have a part that measures vacuum to the right of 0 on the pressure gauge.  As the vacuum pump pulls more and more vacuum the gauge will read a vacuum more towards 30 hg (which is what you want).  If for some reason it dosn't move at all, you probably have a sizable leak somewhere and you need to find it in order to close it off.  It is usually an o ring or some other fitting so look carefully.
a/c gauge low side no vacuum
blue gauge at zero, vacuum pump not started

a/c gauge low side vacuum at 29hg
vacuum pump close to 30 hg vacuum means its working
Once you have a good 30hg of vacuum then let it run for 30 to 45 minutes.  Turn the valve handles on either side of the manifold gauge to the right (closed) and turn off the vacuum pump.  Failure to close the handles can make the vacuum you created in the car's system suck all the oil out of your vacuum pump and into the car which is a disaster (dont ask).  Watch the gauge for any drop in vacuum for a few minutes, there should be no drop, and if it looks good fill it with the refrigerant.  Or just disconnect it and put the caps back on the ports.
Do not be in a hurry to do this because the process takes over an hour anyways so why rush?  Put on your favorite music, read a magazine or whatever because you just saved yourself a bundle of cash.  And dont loose your cool.

MAZDA MIATA BRAKE ADJUSTMENT PAIN


Anyone who owns a Mazda Miata and has replaced the brake pads on the rear wheels knows that adjustment of the parking brake is the biggest pain ever!  On the rear of the rear brake caliper is a small 14mm bolt that covers a secret adjustment screw.  It is this screw (it uses a 4mm hex) is the cause of a lot of problems when installing rear pads.

Above is an example of a rear caliper.
This is the hidden bolt on the rear of the caliper.  The spring/cable bracket is removed for clarity.
Once you have the bolt removed (it has a washer so dont lose it) you can loosen the piston to fit the new pads.
It takes a 4mm hex or allen to retract or tighten the e-brake actuator.  Once you have retracted the piston as far as you need to put in the new pads, put the whole caliper back onto the disk and tighten the caliper bolt to specifications.  The hidden bolt should still be open at this time because we are not done with it yet.  With the wheel off the ground (obviously) slowly turn the disk and tighten the retracting screw with the 4mm hex (or allen for you weirdos) until the disk stops moving. Back off the screw about 1/3 (thats one third) of a turn and see if the disk turns freely.  If not back off a little more till it turns.  Then tighten the hidden bolt cover and you are done.  
If, for some reason know only to you, your screw falls out onto the ground while manipulating the caliper this is what it looks like.
mazda miata rear caliper adjustment piston re-tractor screw
Just stick it back in and continue no harm done.  If for some reason it becomes hard to turn the screw, please for the love of all thats holy do not force it or you just bought a new caliper.  It doesn't take much force to adjust the screw and you will destroy it if you do it too hard.  Run your car for a few miles checking the rear brakes for seizing (that means you tightened it too much).  Get back under the car and loosen the bolt and loosen the screw a small bit to make the parking brake the perfect distance between too tight and not tight enough.  
Because not all brake pads are the same size and shape as the original Mazda brake pads, it is probably not possible to get it right on the first try (God knows I didn't )but keep at it and you will have it perfect.  Keep your Zen attitude and you will probably get it done quickly........maybe.

Tuesday, October 25, 2016

2003 Ford Escort SPI engine destruction

2002 FORD ESCORT 2.0 SPI ENGINE FRAG


The Ford 2.0 single overhead camshaft engine is a real piece of work. It has an inherent flaw that results in the entire engine having to be scrapped:  the valve seats come loose. Yes, yes, I know.  That doesn't seem possible since no engine would work with that problem as they all have valve seats, and yet here we are discussing it.  There are many articles online about this particular problem but there are no real solutions.  Perhaps the only viable solution I personally have come across is 1. changing out the cylinder head with one that has reinforced valve seats.  Any other solution, and I have seen some crazy ones, will lead to the engine totally destroying itself as it eats bits and pieces of valve seat. This also happens to be the cheapest route to fixing these engines, assuming of course that yours hasn't already fragged. 

One other solution, one that is a bit more extreme, is to 2. change out the SPI engine with the DOHC engine of the same size.  Since Ford makes two engines for this same car, including the Focus, it is possible to change out the engines as long as you get a few things from the DOHC car.  A new air intake box is needed, a new exhaust pipe, possibly a new automatic transmission (although many have just bolted the existing one on) and the wiring which includes a new computer.  This will result in a complete and noticeable change and will give you a more powerful engine with the same gas mileage, if you care about that sort of thing.  Personally I care more about my engine totally destroying itself and leaving me stranded than MPG.  But that's just me.

Thursday, July 24, 2014

Volvo Bread Clip for A/C compressor repair

Temporary Fix for A/C Volvo


As the Volvo compressors are a little expensive, this might help those who are wanting their cold air back at a fraction of the cost for a new compressor.  Note:  this is a temporary fix only, however, it has been working on my own volvo for several months so I do recommend it.  Cheers and keep your Zen !


Tuesday, May 27, 2014

Volvo Air Compressor Cuts Off After Running Fine For Several Minutes

VOLVO MADNESS


The Volvo s60 models of early 2000s are prone to an A/C compressor cutting on and off at the weirdest of times.  The cause of this cut out craziness is that the compressor clutch is getting worn and is too far from the electromagnet coil to engage the compressor.  Its kind of maddening to think that the only thing wrong with the A/C of your awesome Volvo is a slight difference of 0.2 to 0.4 inches of space.  That being said, the preferred method of fixing (I use that term liberally) is to bread clip the ##@##.  A bread clip is the plastic clip that comes on a loaf of bread that keeps the bag sealed.  It is cheap and readily available and for some reason works remarkably well here.  A zip tie has also been used but they are a little thicker and can lead to the clutch wearing if its too close.  
Here is where you stick the bread clip.  Keep in mind you have to cut off the excess plastic of the clip:
volvo s60 bread clip a/c compressor air clutch gap

Keeping the bread clip under this part of the clutch lowers the distance between the clutch and disk that drives the compressor as I show in the is next photo. Keep in mind a distance of 0.02 inches is about the norm:
volvo s60 a/c compressor air gap between clutch and drive
The red arrow shows the clutch gap with my screwdriver inserted to make it easier to see.  
It is possible to do this repair with the compressor on the vehicle and still get away with it.  You will not hurt anything and it is worth having your a/c back in the summer (especially in Florida).  Go for it. On the other hand, mine only lasted about 6 months so a new compressor being about $200 it is worth replacing which is what I did with mine.  
If for some reason you are thinking of breadclippin', don't loose your cool. There ain't much space under the Volvos so keep calm and keep bread clippin your way to cooler times.


Monday, April 14, 2014

WHEN LEAKS ATTACK

Drip drip goes the Cadillac


A customer brought to me a 2004 Cadillac  SRX with the 4.6 liter engine.  Evidently it had been leaking fluid for some time in small amounts but now it was a full blown gusher.  Nice orange spot every time she parked.
"Help me!" she cried.  I guess I'm a sucker for dames so what the heck, I decided to see what I could do.
Observing a large puddle of dexcool under the car, I took a flashlight and examined the front of the engine.  Yup.  Leaking from water pump weep hole.  Nice simple job.  Put a new pump in, bled the system and checked it for leaks.  Still leaking, only this time from the other side of the engine!  I verified that the pump was bad (it was) and resolved to find the other leak.  

First thing was to get some coolant dye that was compatible with dexcool. Here is what I used.
dexcool coolant leak dye detector for finding leaks
What I saw was the coolant leaking from behind the intake air hose from a piece of metal that connects to the intake manifold. It is known as the water outlet.
2004 Cadillac SRX throttle body
This caused a significant leak down the passenger side of the engine and cannot be seen because the gaskets are on the rear side of the intake water outlet. So it has to come off.  Like these picture show, there are four bolts that hold it on and a large hose and small hose on the left side.  But first the throtle body bolts have to come off. There is a hidden bolt behind the throttle body.
Throttle body removed and the bolts are clearly seen.
Once the assembly had been removed, the leak area and gaskets could be clearly seen. Notice the scale buildup on the right hand picture.  The gaskets were similarly covered.  A leak was inevitable.
Here's a destroyed gasket that shows the scale buildup and reason for the leak.
New gaskets with part number from GM.  (Dont get them at the dealer, they are 6x as expensive)

Thread in the bolts to hold the gaskets and then put some locktite thread sealer on it to hold them in place.
Torque it down and put the throttle body bolts back on.  assemble the rest of the small stuff you took off (hoses, wires, etc) and refill it with coolant.  It should look like this when you are done.
On an added note, there is a tee fitting for the radiator overflow tank that sits on top of the radiator.  You can see it in the above picture on the lower right hand corner.  Notice the one I have is metal while the original is plastic.  Discard the plastic one and get a metal tee.  The plastic will break and leak all over the place while the metal one will probably outlast the vehicle.  Just one less leak for you to worry about.
If your zen concentration and relaxation techniques are up to par, you will not feel the least bit angry about the horrible leaks the SRX can develop.  Except for that tee fitting.  That's really pushing it Cadillac!!

Thursday, April 10, 2014

VOLVO STEERING PROBLEM

2002 VOLVO S60 STEERING YIKES!!


Some time ago I bought my wife a used 2002 Volvo S60.  It had been in a small accident on the right front side but was otherwise in good shape.  The only problem was that when you hit the brakes (even slightly) it would take a hard left turn!  Talk about super dangerous!  Especially if you did it in traffic at high speeds!  Well, my wife had a few choice words with her mechanic (me) and I decided to hunt down the culprit. 

On the S60 Volvo, the control arm has rubber bushings that isolate it from the metal of the arm.  These bushings are prone to cracking or even breaking.  The final result is that when they frag, and believe me they do, you will suddenly find yourself making an unscheduled turn right into someones house.  Being the tight wad money saver that I am (am I right guys?) I resolved to fix these bushings by having new ones pressed in instead of replacing the entire control arm.  

 The bushings are indicated by red arrows.  Notice one is entirely gone (the rear one).


2002 Volvo S60 control arm bushings removed or trashed


Bad idea.  Unless you use the factory bushings, I didn't, you are asking for trouble. Even then, if for some reason the shop you can find to press in the bushings doesn't do it exactly right you will face another unscheduled turn in traffic.  Let me cut to the chase.  Suffice it to say, that within a month of driving with the"new" bushings, they had once again broken and the car was steering crazy when braking.  

Do yourself a huge favor (and your wife) and replace the entire control arm with bushings.  Better yet spend a little extra money and buy the Volvo control arm.  As it turns out, the control arms only last about 20,000 miles before they frag.  The price of owning a Volvo I guess.  

Wednesday, April 9, 2014

THE CASE OF THE GRUMPY STALLING CHEVY CAVALIER

CHANGE YOUR DIRTY SOCKS


I am struck by the way diagnosing vehicles is a test of my amazing Zen calmness.  Take my 2002 Chevrolet Cavalier LS 2.2 OHV, for instance.  It was in all respects a well running machine......until it got to the lower quarter of the gas tank.  Then, for no apparent reason it would stall but only when  taking a left turn. ??????????????????   My first thought was that a wire to the fuel pump circuit was at fault.  I mean, only on left turns?  Yup.  Only left.  

I checked all the circuits and they were undamaged.  This is right about where my Zen  gets tested.  Back to basics, I thought.  If it wasn't an electrical problem, then it must be fuel. But why only when the tank was quarter full?  A faulty gas gauge?  Sounds reasonable, I thought.  I had a Mini Cooper with one of those.  Customer wondered why it was dying all the time and turns out the gas gauge was faulty so they kept running out of gas.  Kind of unlikely though.  

Unfortunately, the only thing that seemed reasonable was the fuel system.  Something in the tank was moving when I took a left turn and either shut off the fuel pump or clogged it.  Either way the fuel tank had to come out.  Ouch.  I hate doing that.  Its not the black widow spiders that make a home in the suspension, or the tree frogs that hide in the suspension that makes it so fun.  Its all the dirt that rains down in a shower right in my eyes that really makes that extra fun.  But I digress.....

Out comes the fuel tank and then the fuel pump, only to find everything sound and in good condition except........the outer fuel sock had a rip in it.  Being nylon, I was surprised that it was ripped.  It's pretty tough.  If that one was ripped, what about the other one inside the fuel pump.  I had a gander.  Yup! Bingo.  Not only was the inner fuel strainer ripped, it was falling to pieces like a piece of toilet paper!  Pieces of it were littered in the fuel pump canister and obviously clogging the pump when the tank was low on gas.  As I took a corner, the fuel would move all the pieces into the path of the fuel pump pickup and starve it.  When the tank was more than half full, it would float out of the pickup reach.  Problem solved. Although in this case, I went ahead and replaced the entire fuel pump assembly since there was no telling if some of the sock had gotten in the pump mechanism.  Note to everyone:   change your socks like your mamma told you.


Wednesday, February 12, 2014

A Smelly Car Is An Angry Car

Menthol delights


Ammonia in the Morning


While it can be said that fixing a vehicle is more important than the cosmetics of said vehicle, there is nothing more irritating than a smelly interior.  Let's take the Toyota Corolla I currently own.  I bought it from someone who had a penchant for smoking menthol cigarettes.  I'm not being judgmental, but nothing smells quite as crappy as a menthol tobacco smell all over the car ( almost like being in an anti-tobacco ad right?) I am currently trying to fix up this smell-mobile so I gave some thought to getting rid of the smell.

First up was baking soda.  Nice mess.  Looks like it snowed inside my toyota. It didn't work either.

Next, I tried boric acid powder.  See above.

Finally, on the advice of a car detailer I knew some years back, I set an open bowl of ammonia on a seat and closed all the doors and windows and went to bed (bed is optional, but it was late and I was done).

Morning time and I hit a cup of coffee (essential for zen car repair) and checked the corolla. Upon opening the door, I was hit with a gust of ammonia.  If I wasn't awake before then, I was now.  After leaving the car doors open for a few minutes, I poked my head in and took a big whiff.  Smell gone.  I don't know how it works, but it does.  I was just glad I didn't have to smoke menthol cigs while driving or fixing the car.

Friday, June 28, 2013

Gremlins in my F-150

When Ants Attack

I realize now that there are some things beyond even my awesome ability to predict. Normally, on a good day, that doesn't mean much but let's face facts:  my sanity is hanging by a thread. Practicing the Zen method of car repair helps me keep what little sanity is left to me.  

Ok, sermon over.  What has this to do with Ford F150's and ant?  Everything. As I was minding my own business, driving down the road in my 150, it shut off.  No engine lights, no sputtering, no misfires just a complete shutdown.  Coasting to the side of the road, I sat there baffled.  I realized that a multitude of problems could be the result of my truck's abrupt death but where to start.  Sitting there for a minute, I decided to try restarting it.  It started right up and off I went.  Got it back home and it dies in the parking lot. Great.

I checked the computer which showed no codes, and no real problems.  Even better. I went back to the basics and decided to check for fuel, spark and compression. Fuel being the easiest, Zen practice here, I checked the fuel pressure. Zero upon turning the key on. Bingo.  Turned the key and listened to the fuel pump and it didn't make a sound. There was my problem:  fuel pump dead.  I started making preparations to pull the tank and replace the fuel pump.  

Then it hit me.  There are other things besides a faulty fuel pump that can shut it off.  Just to be sure, I decided to check the fuel pump relay.  This is what I found:


Apparently, ants had gotten into my fuel pump relay and their bodies were making the contacts....um...not contact.  A simple matter of replacing the relay and my truck was as good as new.  The relay would make contact intermittently which is why it started up again but the ants were definitely ruining it. If I hadn't seen an ant going into the relay I might have missed out on a unique opportunity for Mother Nature to screw with my mind.  The real lesson for me here wasn't pest control (I'm sure you are all thinking that but forget it).  No, the real lesson here is that past knowledge is no guarantee that you wont be thrown a confusing situation by the uncontrollable universe of randomness we live in.   Keep your Zen mindset and try to stay calm if at all possible.  I mean if one of natures smallest creatures can stop a 2 ton truck, who am I to say that everything is under my control???

Thursday, June 27, 2013

Rings around Saturns

Smokin and Misfires

The 1.9 liter Saturn engines from the early 90's to the late 90's was a success and failure in many ways.  However, its successes were marred by a couple of things.  One of these things is the constant usage of oil.  Every 1000 miles (1600 km) the engine will burn a quart (.9 liters) of oil.  The first thing you will go looking for is an oil leak.  There isn't one. You will also notice that the oil you just changed is dirty as heck.  If that doesn't push your meditation to achieve calmness nothing will.  

It turns out that the pistons on these cars was included without a proper oil scraper relief hole.  That being said, when the oil scraping rings wipe the cylinder, the oil has no where to go and gets burned.  Eventually, these rings get carbon build on them and they stop scraping oil all together causing a nice white smoke to come out of your tail pipe.  Here's a look at the piston:


As you can see, there is no hole through the piston for the oil rings to scrape oil through, only the holes on the side.   This is not enough to keep the rings from sticking and eventually burning oil like crazy.  Aside from replacing the rings and putting the engine back together, there is no real fix to this.  There are aftermarket pistons with the holes drilled for the oil available that will probably solve the problem though.  In the meantime, try not to worry about the oil burning.  Just keep topping it off and drive it normally.  

The other problem I have had with older Saturns involves the ignition system.  If you try to put in platinum spark plugs or change out the coils for better aftermarket ones, you will get a camshaft sensor code and your engine light will come on. Why???  Well, it turns out that these cars have a sensitive ignition system that only works with the original system.  Putting in advanced spark plugs will cause a misfire and an camshaft sensor code to pop up, even though there is no cam sensor!  Put in copper old school spark plugs, and original coil packs or you will be ripping out the last hair on your head trying to figure it out.  (And that aint good for your Zen) 

Tuesday, June 25, 2013

Rockin The Nissan Pathfinder

Pathfinder Death Sway

You are driving down the highway minding your own business in your 2002 Nissan Pathfinder when suddenly it starts to rock back and forth.......violently!  I don't know about you, but that is enough to make me need a clean pair of shorts.  The truth of the matter is that the Pathfinder has a fatal flaw in the rear suspension.  Bushings.

As the bushings wear out, they start to wiggle the rear axle back and forth. At highway speeds, this translates to a rocking motion that will scare the bull spit right out of you (unless you are a zen master in which case you will just need an underwear change).  If you have kids, they will love this new ride.   In any case, you have to address this problem so without further ado, I introduce the 2002 Nissan Pathfinder bushings of death:


As you can see from the above diagram, the bushings indicated by the red arrows are the culprits.  A good online company can sell you the bushings or the whole arms to put in for a relatively cheap price.  This will help get back most of the calm zen like attitude you lost when your Pathfinder gave you a Pirates of the Caribbean ride.  Don't forget to check the other bushings down under there while you are at it. The panhard rod, stabilizer links, and shocks could all be worn as well.  As soon as you are done, congratulate yourself on a job well done........then off to the store for new underwear that you now so sorely need. 

Tuesday, June 18, 2013

THE HYUNDAI GHOST (CRANKSHAFT SENSOR)

Ghost in the machine

From time to time there will come my way a car that has a no start condition.  That by itself is not unusual. What is unusual is the dead car with no code.  Car computers are getting pretty good at figuring out what is going wrong with an engine and alerting the driver by setting a code.  When this 2002 Hyundai Elantra showed up at my door with an engine that would stay running for 15 minutes and then die, my first thought was to look at the codes. There was a code for an malfunctioning MAP but nothing else.  

Hmmmmmm.  Something didn't seem right about that.  Normally a malfunctioning MAP wouldn't lead to the engine dying every 15 minutes.  Did I mention that it would start up again when the engine cooled?  No?  Well it would.  

Replacing the MAP, I sent my customer on their way.  They called back about 20  minutes later.  Engine died.  So, back it came.  

Not having any codes to go by, I did my homework, Zen style (trying to relax), and discovered about 40 things that cause a car to die.  Not helpful.  However, using the Sherlock Holmes method, that being the most obvious solution is usually the correct one, I decided to inspect the crankshaft sensor.  

Crankshaft sensors have a bad habit of cracking  and yet still working. Not having a scope to check the wave form of the sensor, I just removed it.  Here's what I found:


As you can see, the casing is cracked.  Oil was seeping into the electrical contacts from the engine block.  When the sensor was hot, it would stop working.  Cooling down, it would start working again. I had found my ghost.  So why didn't it set a code for a bad crankshaft sensor? My online homework did not discover the answer to that question, but 90% of the time it doesn't set a code.  

This is why the Zen meditation method of engine repair is so necessary.  It's this kind of thing that will push your already fragile mind over the edge of  sanity. Unless you have a wave form tool, you will be going crazy trying to find a misfiring or dead engine caused by a bad crankshaft sensor.  Remember also the Sherlock Holmes method. Most obvious causes should be checked before ripping apart the wiring to whatever particular "piece" you happen to be working on.

Cheers